 On the face of it, Panasonic’s Lumix TZ90 / ZS70 doesn’t add a lot to the earlier TZ80 / ZS70. The touch screen flips up and over and there’s a new 20 Megapixel sensor which delivers better quality 4k UHD video. However, with a 30x optical zoom, built-in viewfinder, great continuous shooting, 4k UHD video with PASM exposure control, 4k photo modes, RAW recording, and a wealth of other features, it remains one of the most powerful pocket super-zooms around and comes Highly Recommended. But if you can live without the flip-up screen the earlier TZ80 / ZS60 is well worth keeping in mind.
Panasonic Lumix TZ90 / ZS70 review
-
-
Written by Ken McMahon
In depth
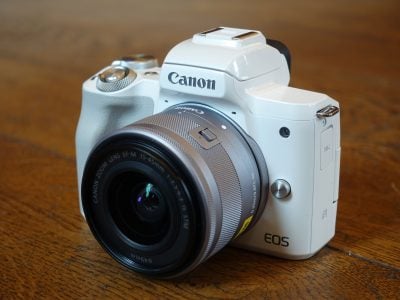
Panasonic’s Lumix TZ90, or ZS70 as it’s known in North America, is a pocket-super-zoom with a 30x optical range, 20 Megapixel sensor, 4k video, tilting touchscreen and built-in electronic viewfinder. Announced in April 2017, it’s the successor to the previous TZ80 / ZS60, although the usual annual gap between them has widened from a year to 15 months. Like its predecessor, it becomes the top model in the long travel zoom series, although the TZ100 / ZS100 remains above it for those willing to trade zoom range for a larger 1in sensor.
The new Lumix TZ90 / ZS70 is essentially the earlier TZ80 / ZS60 with a couple of updates. It shares the same fairly pocketable body with the same 30x / 24-720mm optical zoom (3cm macro) and the same built-in electronic viewfinder with eye sensor and 1066k dot resolution. Like its predecessor, it can also record 4k video, RAW files, supports USB charging and of course features built-in Wifi.
New to the TZ90 / ZS70 is a higher resolution 20 Megapixel sensor (vs 18 on the previous TZ80 / ZS60, or 12 on the older TZ70 / ZS50) and a touchscreen that now tilts. The TZ90 / ZS70 also inherits the 4k movies and 4k Photo modes of its predecessor, allowing you to effectively shoot 8 Megapixel images at 30fps, refocus after the event and even adjust the depth of field. So while the TZ100 / ZS100 remains the flagship Lumix travel zoom, the TZ90 / ZS70 updates its already capable predecessor to become the most powerful 30x pocket super-zoom around.
Panasonic Lumix TZ90 / ZS70 Design and controls
The Lumix TZ90 / ZS70 will look very familiar to anyone who already owns a recent TZ/ZS series super-zoom. Panasonic doesn’t go much for curves on these models – essentially it’s a rectangular box with a grip stuck on the front, albeit quite a stylish one.
The Lumix TZ90 / ZS70 measures 112mm x 67mm 41mm and weighs 332g with a card and battery fitted. It fitted comfortably in the pocket of my baggy shorts, but was more of a squeeze to get it in the back pocket of my (not baggy) jeans. The TZ/ZS series has been getting a little bigger and heavier with each new generation; this time around it’s largely the tilting screen that’s responsible for the additional few millimetres on the depth and height and the extra 50g (a little under two ounces) in weight.
The Lumix TZ90 / ZS70 is still one of the most compact super-zooms around to sport a 30x optical zoom, but not as compact or as light as the 40x Canon PowerShot SX730 HS. Measuring 110mm x x 64mm x 40mm and weighing 300g with the battery and a card fitted, the PowerShot SX730 HS is just a little bit smaller all-round and a tad lighter. It doesn’t look much on paper, but’s it’s enough to make a difference. When I was carrying both around (one in each pocket of my capacious shorts) I could tell as soon as I put my hand in my pocket which model I had. The PowerShot SX730 HS’s rounded corners further enhance the impression that it’s slimmer than the Lumix TZ90 / ZS70. Below you can see a side-by-side comparison.
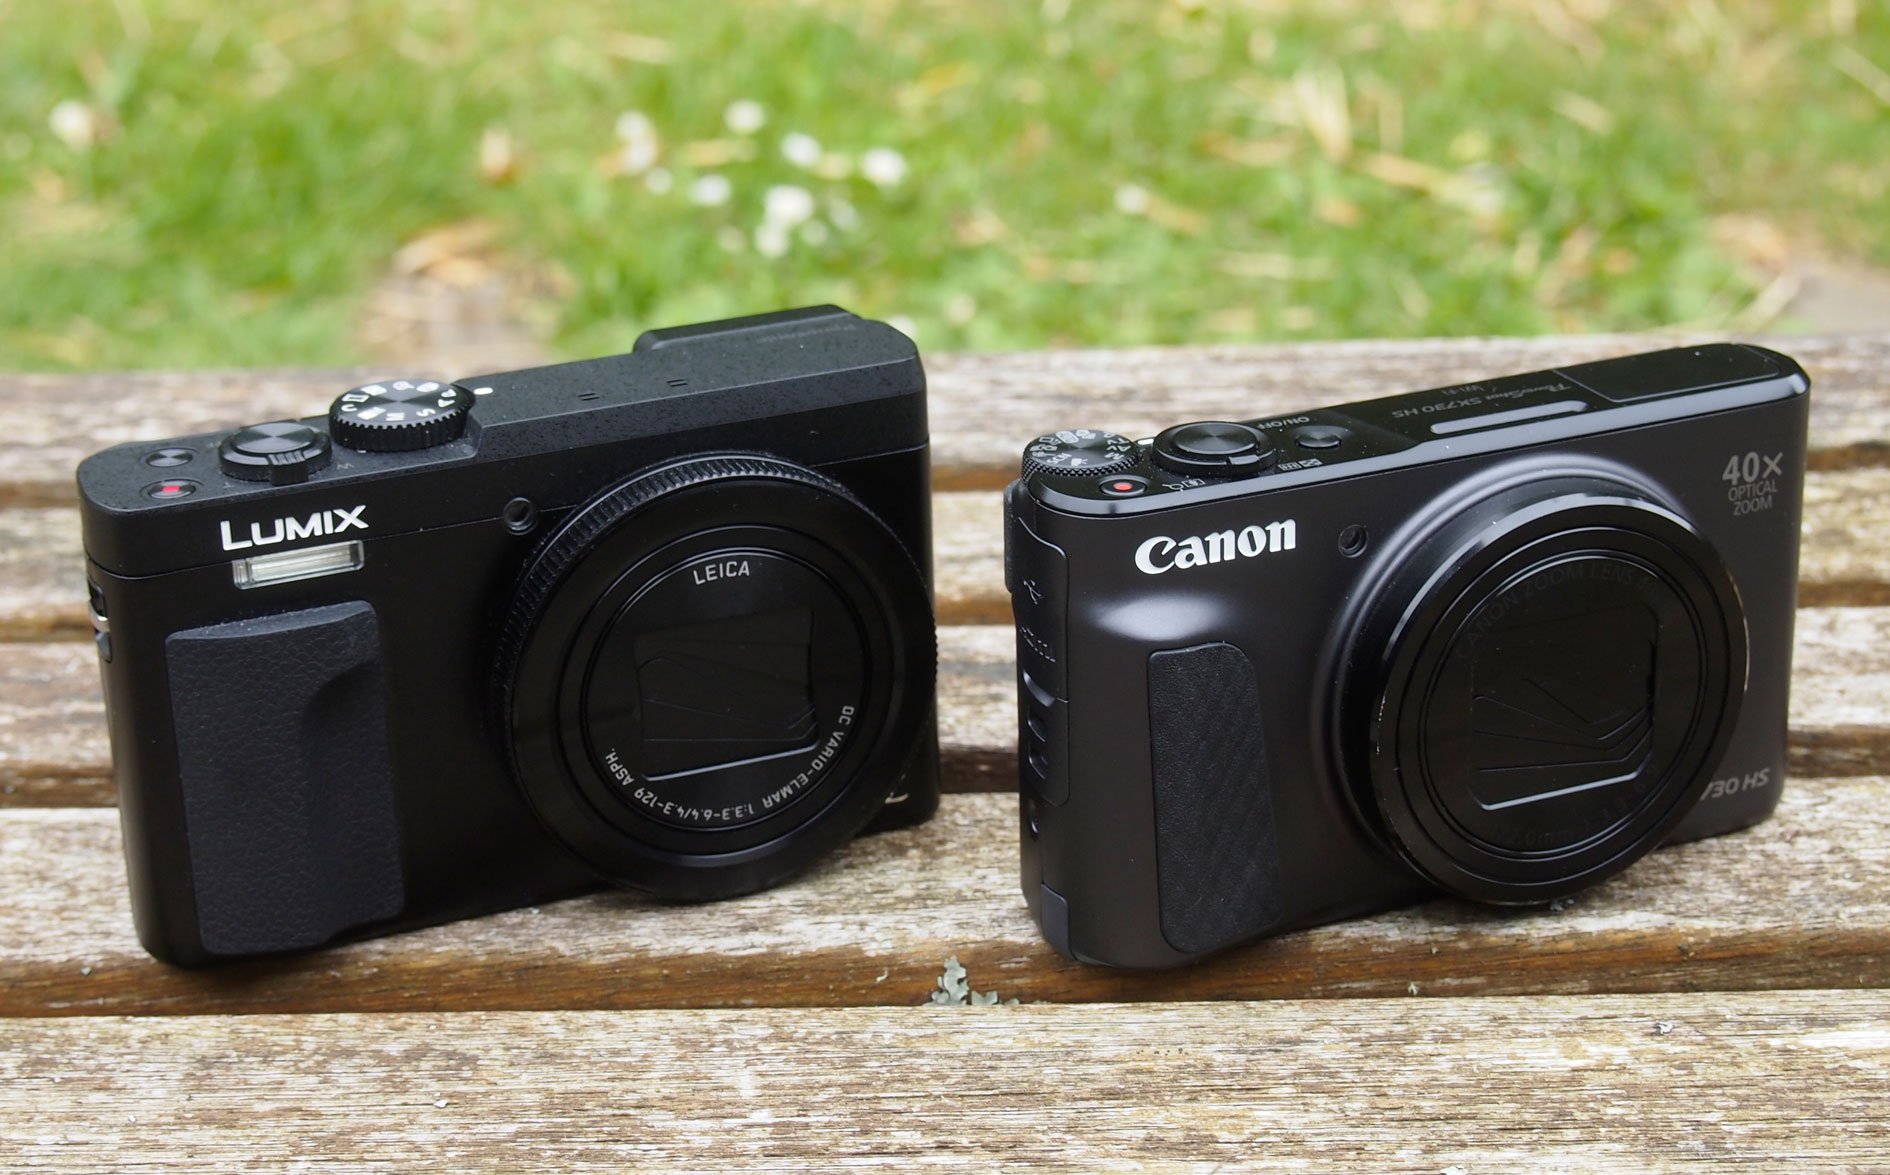
Above left: Panasonic Lumix TZ90 / ZS70. Above right: Canon PowerShot SX730 HS.
The Lumix TZ90 / ZS70’s front grip is a good size and combined with the rear thumb rest, which is made of a soft rubber-like material, provide a secure grip which you can feel confident about even when using the camera one-handed. The PowerShot SX730 HS’s grips aren’t so substantial, but the moulded contours and lighter weight mean they don’t need to be.
This is probably a good point at which to mention that the TZ90 / ZS70’s colour scheme has changed. As before, it’s available in black or silver, but where the siver TZ80 / ZS60 has a black body with a silver top plate, on the TZ90 / ZS70 it’s reversed – silver body and black top plate.
The control layout on the Lumix TZ90 / ZS70 is more or less unchanged from the earlier TZ80 / ZS60. The on/off button on the top panel is now a recessed disc, rather than lozenge-shaped, other than that, everything’s exactly as it was before. In front of the on/off button you’ll find the movie record button, now that the on/off button is the same size and shape, it’s more difficult to tell the two apart and I got them mixed up more than once to begin with, though this is something you’ll quickly get used to. As before, the mode dial is set into the raised left section of the top panel and has positions for the PASM exposure modes, Intelligent Auto, Creative effects, Scene modes, Panorama, Creative Video, and a Custom position.
On the rear panel The four-way controller and dial is surrounded by no fewer than four programmable function buttons, assigned by defult to 4K photo modes, Post Focus, the Q Menu, and Monitor/EVF mode toggle. There’s also a playback button and display information overlay button.
There is, of course, a very significant design update on the rear panel, though you’d hardly know to look at it. The previously fixed screen now flips up through 180 degrees and can be used to shoot from the waist and other positions as well as facing forwards for selfies.
The screen is fixed with one small hinge at the top and when folded in sits almost flush with the camera back – it’s flush at the top, with the EVF and thumb rest left and right respectively and there’s a bevel on the right edge where it meets the rear control panel, a very slick design.

In every other respect the monitor is the same panel as on the earlier Lumix TZ80 / ZS60. It’s an LCD display with 1040k dots and it’s touch-sensitive. It can be used to place the AF area for focusing, meter exposure, shoot and select soft function buttons, and also allows menu selection and entering of details when making network connections. It’s one of the big advantages the TZ90 / ZS70 holds over Canon’s SX730 HS has which has neither a touch-screen nor a viewfinder, though, like the TZ90 / ZS70 its screen can fold up and forwards.
The Lumix TZ90 / ZS70 is the third generation to include a built-in 1166k dot electronic viewfinder, the same one featured on the higher-end Lumix TZ100 / ZS100. An eye-sensor and a button for toggling between the viewfinder and the screen which doubles up as Fn4 works in the same way as other recent Lumix models with three options – viewfinder, screen or eye sensor, the latter activating the viewfinder when you put your eye to it and the screen at all other times.
The viewfinder provides a small but bright and detailed view. It’s invaluable in bright sunlight and holding the camera to your face also helps steady the camera when shooting at slower shutter speeds – or at long zooms. You can also use the touch-screen while composing with the viewfinder to reposition the AF area. There are two modes; Exact, which positions the AF area at the coresponding point where you tap the screen and Offset, which works like a trackpad, moving the AF area from its original position as you drag on the screen. You can also turn touch pad AF off to avoid inadvertently repositioning the AF area when using the EVF.
The TZ90 / ZS70’s combined battery and card compartment is accessed via a door in the base – note it’s not possible to change the card or battery when the camera is mounted on a tripod. The BLG10E battery (the same one used in the TZ80 / ZS60) provides enough power on a full charge for 380 shots using the screen exclusively or 250 shots with the EVF so, in practice, probably somewhere between the two. That’s a little better than the 250 shots you’ll get with the Canon PowerShot SX730 HS, but the SX730 HS’s Eco energy saving mode extends that to a more generous 355 shots.
The Lumix TZ90 / ZS70 charges its battery in the camera via the standard USB port. An a/c adaptor and a USB cable are included in the box, though you can use any USB Micro B cable and any suitable power source, you can’t externally power the camera while shooting. If you switch the Lumix TZ90 / ZS70 on while it’s charging an alert that tells you ‘To begin charging turn the camera off’ is displayed. You can still shoot, but the battery won’t start charging until you turn the camera off. The PowerShot SX730 HS battery can be charged in-camera over a USB connection, or externally using the supplied AC unit. But unlike Panasonic, Canon doesn’t put a USB cable in the box, so unless you have a Micro B to A type cable lying around, you’ll have to buy one if you want to charge the PowerShot SX730 HS’s battery in the camera from a laptop or other USB power source.
The Lumix TZ90 / ZS70’s built-in flash is located on the front panel just above the grip – you need to take care not to obstruct it with your fingers. Its quoted maximum distance at the wide angle setting is 5.6m but in the absence of an ISO sensitivity setting or a Guide number that doesn’t mean a great deal. If, as is likely, it’s calculated at 1600, or worse, 3200 ISO that means it’ll be much more limited at lower ISO’s. At any rate, It’s useful for fill-flash and reasonably close subjects. It has Auto, Forced on, and Slow Sync modes, plus each of those three with a red-eye reduction option.
Panasonic Lumix TZ90 / ZS70 Lens and stabilisation
The Lumix TZ90 / ZS70 retains the 30x 24-720mm equivalent f3.3-6.4 lens used in the previous three generations – the TZ80 / ZS60, the TZ70 / ZS50, and the TZ60 / ZS40. Although it’s been around a while, that’s a fairly generous range to have at your disposal in a pocketable compact. But if you want a longer zoom range, look no further than the Canon PowerShot SX730 HS. Its 40x optical zoom, introduced on the earlier PowerShot SX720 HS, starts at the same 24mm equivalent as the Lumix TZ90 / ZS70, but extends to 960mm equivalent at the telephoto end of the range.
The PowerShot SX730 HS’s lens shares the same f3.3 maximum aperture at the wide angle setting, closing to f6.9 when full zoomed in. When the SX730 HS is zoomed to the 720mm maximum of the Lumix TZ90 / ZS70, its maximum aperture is f6.3 – more or less the same. The closest focusing distances with the lenses set to wide are 3cm for the TZ90 / ZS70, and 1cm for the SX730 HS, allowing both to capture good macro images, although giving the Canon the edge.
Panasonic Lumix TZ90 / ZS70 coverage, wide and tele

Above left: at 4.3mm (24mm equivalent), above right: at 129mm (720mm equivalent)
Above are two photos taken from the same position with the TZ90 / ZS70 using each end of the zoom range, illustrating the range at your disposal – at one moment capturing a wide field before getting very close to distant details the next. It’s extremely flexible, and while you need to take care for camera shake at the long end, especially with the much reduced aperture, the stabilisation is excellent and there’s the option to use the viewfinder for even greater stability. Below you can see the range of the Canon PowerShot SX730 HS for comparison. As you can see, the 24mm equivalent wide-angle is the same for both models, but the longer 960mm equivalent zoom on the PowerShot SX730 HS gets you that bit closer to distant subjects.
Canon PowerShot SX730 HS coverage, wide and tele

Above left: at 4.3mm (24mm equivalent), above right: at 172mm (960mm equivalent)
One other thing worth mentioning at this point is that when zoomed in to the Lumix TZ90 / ZS70’s maximum 720mm focal length it can be a challenge to keep your subject steady in the frame. Of course stabilisation helps but with a moving subject it can be easy to lose track of it altogether. While the Lumix TZ90 ZS70 lacks the Canon PowerShot SX730 HS’s clever Framing Assist feature, the built-in viewfinder does make it easier to keep your subject in the frame at longer focal lengths – particularly if the sun is shining.
Panasonic Lumix TZ80 / ZS60 Image Stabiliser off / on
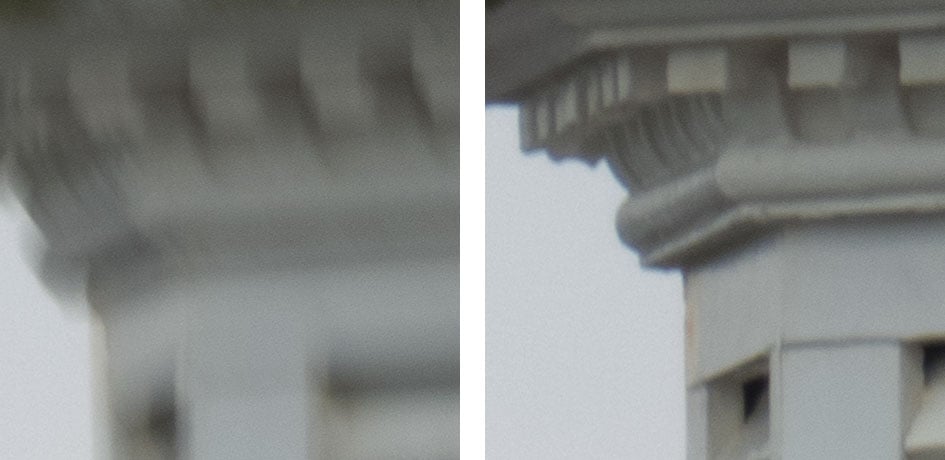
Above left: 100% crop, 4.3-129mm at 129mm, 1/25, 80 ISO, OIS off. Above right: 100% crop, 4.3-129mm at 129mm, 1/25, 80 ISO, OIS on.
To put the OIS system to the test on the TZ90 / ZS70, I zoomed it into its maximum 720mm equivalent focal length and took a series of photos at progressively slower shutter speeds first without stabilisation, then with, to see what it was capable of ironing-out. As you can see from the 100 percent crops below, with stabilisation enabled I was able to get shake-free shots with the TZ90 / ZS70 at shutter speeds down to 1/25 – nearly five stops slower than conventional wisdom dictates is safe. I used the built-in viewfinder to take these shots and having the camera pressed to your face undoubtedly provides a more stable platform than holding it out in front while looking at the screen.
Panasonic Lumix TZ90 / ZS70 Movies
Like its predecessor, The Lumix TZ90 / ZS70 has 1080p HD movie modes at 25, 30, 50 and 60 frames per second. Where the earlier TZ80 / ZS60 frame rates were region dependent you now get both the PAL and NTSC compatible frame rate options for all video modes; 4k UHD video is available at 25 or 30fps.
As before, Panasonic’s 4k Photo modes provide a fun way of exploiting the fact 4k video captures an 8 Megapixel image up to 30 times a second. Panasonic equips its 4k Photo cameras with menus that let you easily capture bursts of video before scrolling through the footage and extracting the perfect frame as a JPEG image, all in-camera. You could of course frame grab from video externally, but Panasonic has made it easy to perform the whole process in-camera.
Returning to the Lumix TZ90 / ZS70’s movie modes, the 4k options record Ultra High Definition video (3840×2160 pixels) at 25 or 30fps and at a bit rate of 100Mbit/s in an MP4 wrapper. But it lacks the TZ100 / ZS100’s 24fps option.
4k is interesting on the TZ90 / ZS70 for several reasons. When I tested 4k quality on the Lumix TZ80 / ZS60, I discovered that while its 18 megapixel sensor produced a higher resolution image with larger detail in 4k video modes compared with 1080, there wasn’t any more detail in the higher resolution image, but there was more noise. With the resolution of the TZ90 / ZS70’s sensor increased from 18 to 20 Megapixels, you wouldn’t expect the results to be much different, but lets take a look.
The Lumix TZ90 / ZS70 starts with a sensor resolution of 5184×3888, from which it takes what appears to be a 1:1 crop to generate a 4k UHD frame. To illustrate the difference in coverage I compared actual 4k footage I filmed with the TZ90 / ZS70 against still photos when using the same lens setting and position. In the image below, the 4k coverage is indicated by the outer edge of the red frame, resulting in a significant reduction in the field of view; indeed when filming 4k video, the equivalent range is cropped from 24-720mm to 35-1050mm – good news at the long-end, but you lose quite a bit of coverage at the wide-end.

Above: Lumix TZ90 / ZS70 crop used for 4k video, indicated by red frame.
This is more of a crop than you get with the TZ80 / ZS60 where, with the same lens but a lower resolution 18 Megapixel sensor, the equivalent range is cropped to 33-990mm.
If you want to capture video at the full sensor width, you’ll need to reduce the quality to 1080, although there’s obviously a vertical crop due to the different aspect ratios – 16:9 against 4:3. Here’s how the TZ80 / ZS60 crop looks for 4k video, below left, compared to 1080p video, below right.

Above left: Panasonic Lumix TZ90 / ZS70 4k video coverage. Above right: Panasonic Lumix TZ90 / ZS70 1080 video coverage.
It’s clear from the views above that filming in the 1080 modes captures a wider field of view, but how does the quality compare? Below are 100% crops made from the 4k footage on the left and the 1080p footage on the right. Note that the 1080p crop on the right shows a larger area with smaller detail not just because of the lower resolution of the 1080p clip, but the wider field of view. What’s interesting about this comparison is that as well as larger detail in the crop on the left, I think there’s actually a little more detail in the 4k crop. If you look at the five arched windows in the white building in the foreground of the 4k crop on the left you can clearly see a vertical centre bar in the middle of each window which isn’t visible in the 1080 crop. There’s also a little bit more detail visible in the cathedral stonework in the 4k crop. When I compared similar crops from the 18 Megapixel Lumix TZ80 / ZS60 I couldn’t see any additional detail in the 4k clip – mainly due to sensor noise. So for Panasonic to have squeezed more 4k detail from a new 20 Megapixel sensor is a real achievement. That said, you’ll get even more detail (and less noise) from the larger 1 inch sensor of the Lumix TZ100 / ZS100.
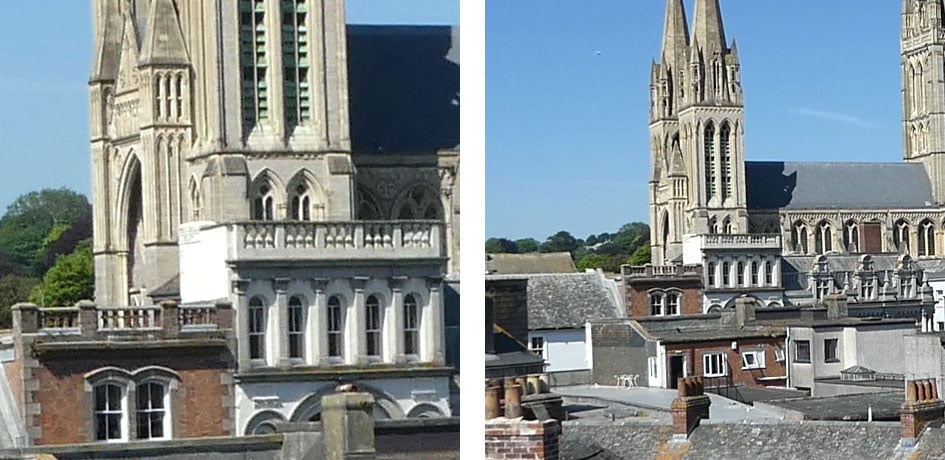
Above left: Panasonic Lumix TZ90 / ZS70 4k video quality 100% crop. Above right: Panasonic Lumix TZ90 / ZS70 1080 video quality 100% crop.
Moving on, the Lumix TZ90 / ZS70 records 1080p at up to 28Mbit/s in AVCHD or MP4 modes. In addition to 1080p50/60, the MP4 modes are 1080p25/30 and 720p25/30. The earlier 640x480p25/30 modes are no longer available.
Switch to AVCHD format and the options are 1080p50 at 28Mbit/s and 1080i50 at 17Mbit/s (from 50p sensor output) or 24Mbit/s (from 25p sensor output). The earlier NTSC frame rates (1080p60 and 1080i60) are no longer available, or at least weren’t present on the UK model I tested.
As before, the Lumix TZ90 / ZS70 can also shoot 720p movies at 100fps for slow motion playback at a quarter real time speed and at includes a 1/8th speed 640 x 480 VGA mode which is absent on the TZ100 / ZS100. Canon abandoned slow motion video modes on the PowerShot SX710 HS and they haven’t reappeared on the newer SX730 HS, so for slow motion video the TZ90 / ZS70 is the one to go for.
Other video features include snap movie, which records a short clip of between two and eight seconds in length. With snap movies you can set up a focus pull in advance tapping the screen to define the start and end focus positions, which is pretty neat. You can also add a monochrome to colour fade in our out effect, as well as a simple exposure fade. There’s are also Time Lapse and Stop Motion modes, accessed through the main menus rather than the movie options. Panasonic recommends using a UHS-I Speed Class 3 (U3) SD card for the 100Mbit 4K UHD and High Speed Video modes and a Speed Class 4 card for everything else. Note the TZ90 / ZS70 does not offer CineLike profiles for later grading, but then I can’t imagine many people wanting this capability on this type of camera.
Inherited from the Lumix TZ80 / ZS60, 4k Live Cropping exploits the resolution of a 4k frame to provide a digital pan and zoom feature at 1080p resolution. You specify the start and end of the clip by tapping the screen to position a 1920×1080 sized frame. You can also set the overall time of the clip to either 40 or 20 seconds. The degree of zoom is limited to the full 4k frame at the wide end to the 1920×1080 frame at the ‘zoomed-in’ end to maintain quality. It’s a neat feature which, once again, makes innovative use of the camera’s 4k resolution to make life easier, particularly if you need a super-smooth panning shot, but don’t have a suitable tripod.
On the Lumix TZ90 / ZS70 you can record in PASM exposure modes, selected either from the video menu or by tapping the exposure mode icon in the top left of the screen when the mode dial is in the movie position. During recording you can change the exposure setting including, depending on the mode, aperture, shutter speed, ISO sensitivity and exposure compensation. While you can use the camera’s physical controls to alter the settings the touch screen provides a slide out panel allowing you to do so silently. You can also tap the screen to pull focus during recording, or of course use the lens control ring. There’s also focus peaking and zebra patterns to help with focus and exposure.
Here’s a selection of clips to demonstrate the TZ90 / ZS70’s video performance in various conditions.
Above: Download the original file (Registered members of Vimeo only). This clip, like the others below was shot using the Lumix TZ90 / ZS70 set to its 4k30p mode. You can see a 1080p version here. The TZ90 / ZS70 does a good job here. Aside from a bit of flare and slight overexposure at the beginning the exposure is good and the quality is excellent. Apart from a bit of skittishness at the end of the zoom the AF is steady and there’s no noise from the zoom motor. The stabilisation does a great job, but it can’t quite cope with the biggest wobbles when the lens is at the full extent of the zoom.
Above: Download the original file (Registered members of Vimeo only). For this tripod pan I disabled the stabilisation on the Lumix TZ90 / ZS70. It’s hard to find fault with this clip; the quality is excellent, the AF is pretty steady and the zoom motor is silent. You can see a 1080p version here.
Above: Download the original file (Registered members of Vimeo only). This interior low light panning shots is well exposed and the colour balance is good. It doesn’t look too noisy but in low light the AF struggles to find something to focus on and stay there. You can see a 1080p version here
Above: Download the original file (Registered members of Vimeo only). To test the continuous AF in low light on the Lumix TZ90 / ZS70, I zoomed in a little, opened the aperture as wide as it would go then focused on the coffee cup on the table in the foreground before pressing record. I then panned up to the lights and mirror and back to the coffee cup a couple of times. On the first pan up the AF takes an age to make the adjustment, but it gets there in the end. It’s quicker coming back to the cup, but still a little hesitant. Continuous AF in low light wasn’t strong on the earlier TZ80 / ZS60, and it doesn’t look like much has changed in this respect. You can see a 1080p version here.
Panasonic Lumix TZ90 / ZS70 Shooting experience
The Lumix TZ90 / ZS70 has six focus modes, Pinpoint, 1-Area, Custom Multi, 49-Area, Tracking and Face / Eye Detection. Face detection can detect up to 15 faces and lock focus on one of them. Multiple AF uses 49 areas to determine the best focus regions and there’s a single area AF option with a resizable AF area that can be moved around the screen. Additionally there are three AF styles, the usual AFS and AFC single and continuous modes are joined by a third AFF, or Auto Focus Flexible mode. This is designed for shooting subjects like children and pets that move in an unpredictable manner. There’s also manual focus with focus peaking.
It’s great to have such a wide choice of AF area modes, but it’s the touch screen that makes the biggest difference to focussing with the TZ90 / ZS70. You can simply tap the screen to position the AF area in single area mode. Custom Multi mode allows you to select a subset of the 49 areas arranged in a diamond configuration a single row or column, or a user defined pattern, then you simply tap the screen to position your AF grid. When you’re in Face detect mode you can also select which eye you want to focus on by tapping it.
As I’ve mentioned earlier, it’s easy to inadvertently reposition the AF area with your nose when using the viewfinder, particularly if, like me, you use your left eye. You can always turn touch AF off, I just wish there was a way to do it temporarily when using the electronic viewfinder.
Another advantage the touch screen provides is additional programmable function buttons. There are four physical buttons labelled Fn1 to Fn4 and all can be reassigned to other functions including ISO sensitivity. Fn3 by default activates the Quick menu and Fn4 toggles between the screen and viewfinder and auto sensing which can be very handy to prevent the screen going blank because your finger is covering the sensor when shooting from awkward angles, so in practice most people are likely to only think about reassigning Fn1 (default 4k photo) and Fn 2 (default Post Focus shooting). The touch screen provides a further five programmable soft buttons labelled Fn5 to Fn8 and by default allocated to WiFi, Level gauge display, histogram display, Snap movie and unassigned.
Plus of course there’s the lens ring and rear control wheel which can both also be reassigned. By default in Manual exposure mode the lens ring controls aperture and the rear dial controls shutter speed. In Aperture and shutter priority modes both controls adjust the same thing – either the aperture or shutter speed respectively and they both Program shift in P mode. As on the TZ100 / ZS100, it would be better if the controls that are redundant in some modes (i.e. PAS) were automatically reassigned, to exposure compensation for example.
In use, the TZ90 / ZS70’s autofocus is quick and accurate. In good light it reacts almost instantly, the confirmation beep sounding almost the instant you half-press the shutter.
As on the earlier TZ80 / ZS60 as well as the TZ100 / ZS100, the Lumix TZ90 / ZS70’s AF supports Panasonic’s Depth from Defocus technology to deliver a quicker response and better continuous AF. Contrast detect AF systems in models like the TZ90 / ZS70 adjust the focus to try and achieve higher contrast in edge detail. But it’s difficult to determine which way to go – is the current focus position in front of or behind the subject? Contrast detect AF systems also find it difficult to know when the optimum focus point is reached, so they often go past the best focus position before returning to it.
Depth from defocus profiles the out-of-focus characteristics of the lens in order to help overcome these problems, resulting in faster more confident focussing. On the Lumix models that I’ve tested it on, Depth from Defocus certainly seems to make a difference. With the TZ90 / ZS70 I couldn’t say whether it results in faster focussing in optimal conditions, Lumix travel zooms were already very good performers in that respect and of course DFD was introduced on the earlier TZ80 / ZS60. What I did notice was that there were fewer instances of hunting in poor light conditions and when fully zoomed in. If the TZ100 / ZS100 can autofocus it will do it quickly and without the back and forth that sometimes occurs with contrast detect only AF.
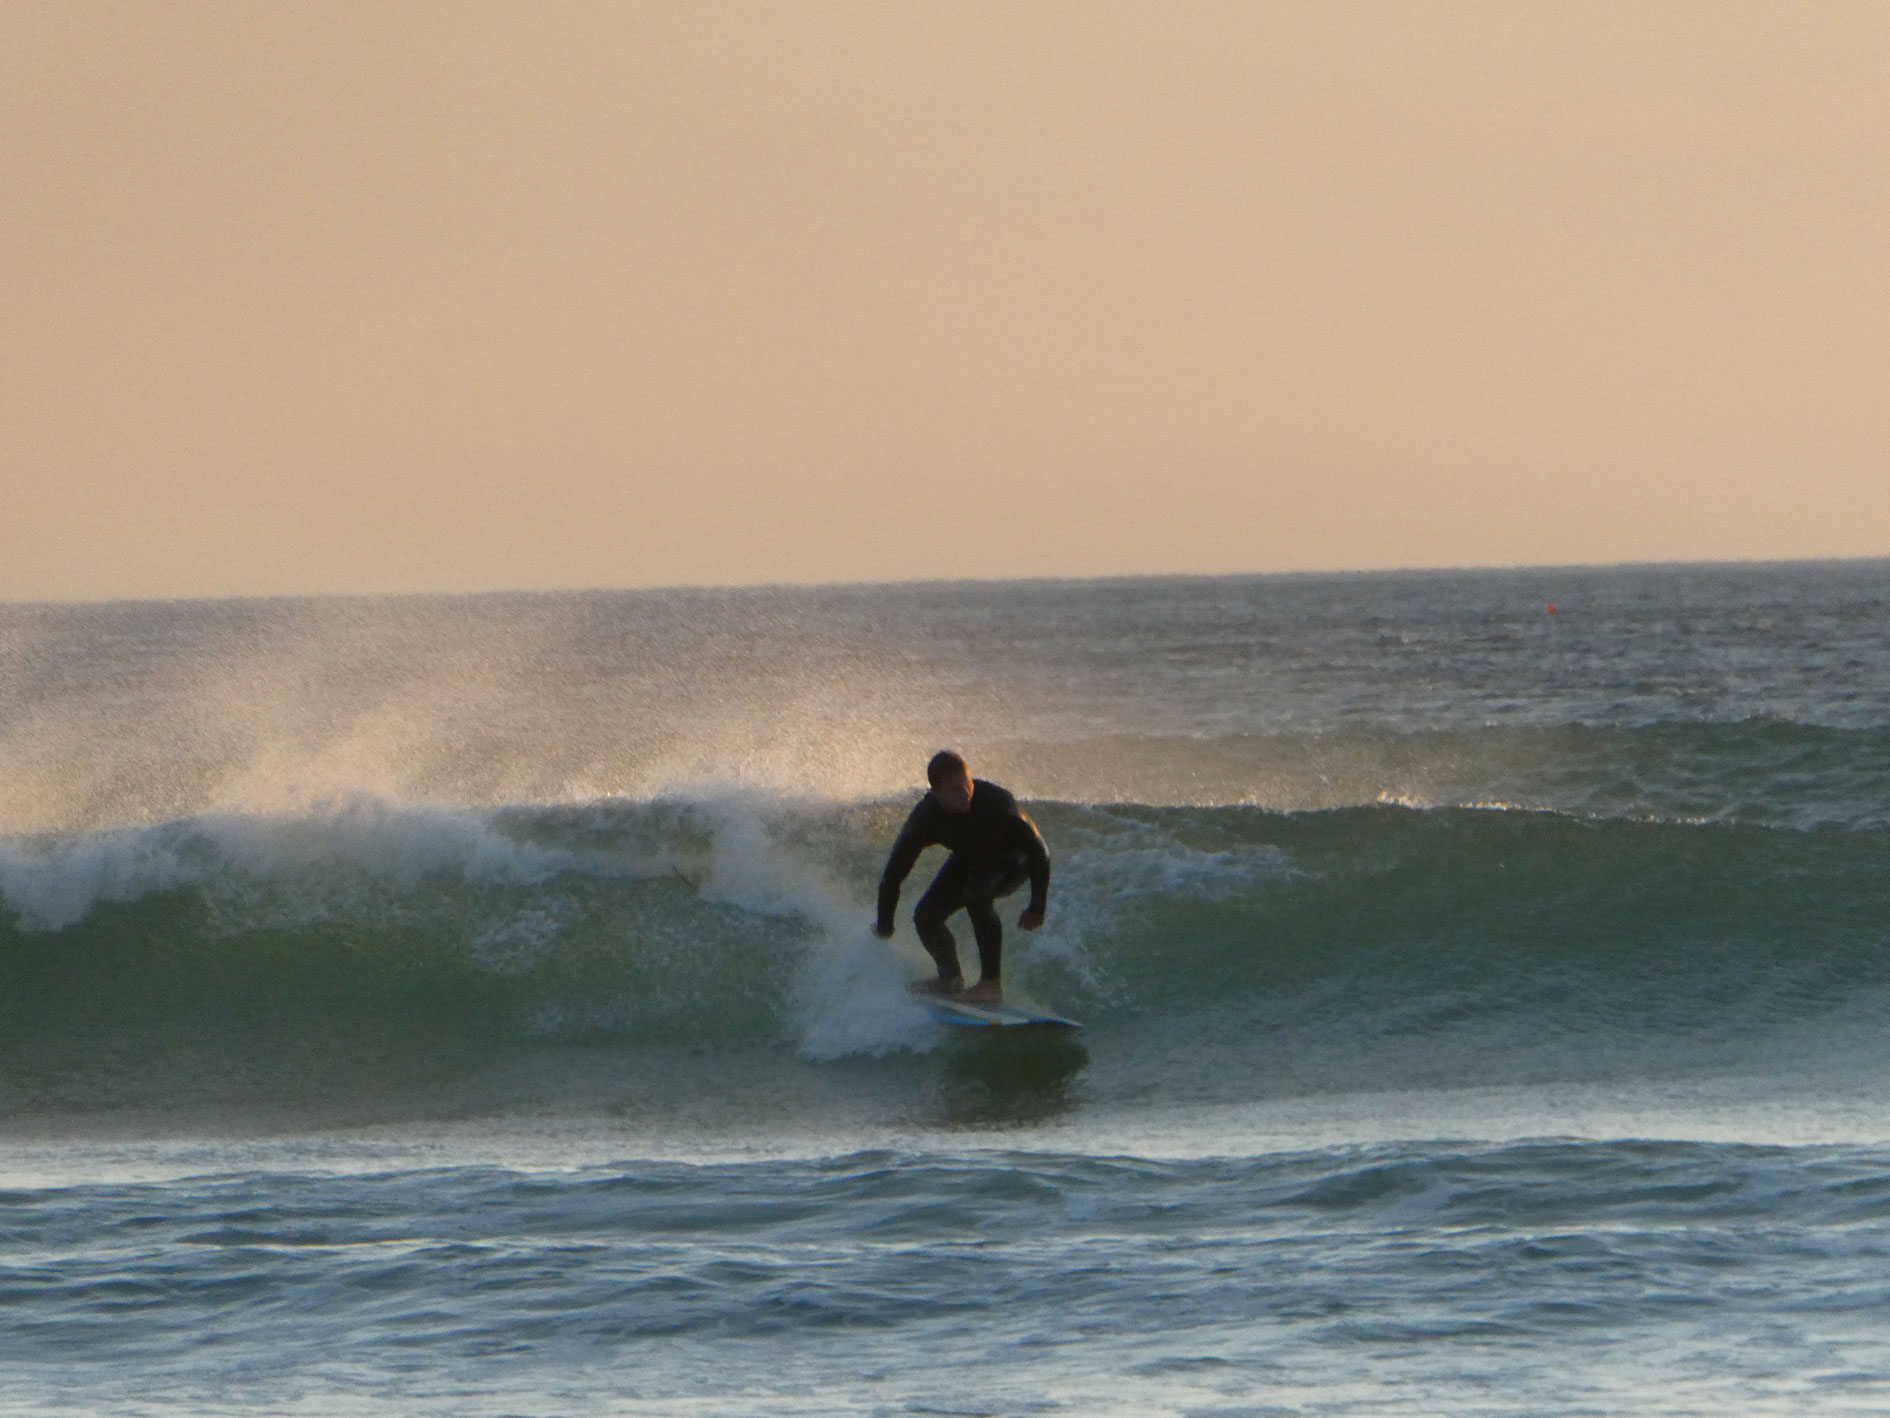
Above: Panasonic Lumix TZ90 / ZS70 Shutter priority 1/500, f6.4, 320 ISO, 129mm (720mm equivalent)
Shooting moving subjects with the focus mode set to continuous is a bit more of a hit and miss affair though. A good example is the surfing shot you can see above. Shooting fully zoomed in, close to sunset, almost into the light, fast-moving wet-suited surfers aren’t easily differentiated from the ocean backdrop. I found the best results were achieved with the TZ90 / ZS70 set to custom multi mode using the central AF area grouping.
On quite a few occassions the Lumix TZ90 / ZS70 failed to lock focus on the subject which was quite frustrating. However when it did, it was on target close to 50 percent of the time. When the sun actually dipped below the horizon, however, the success rate dipped dramatically.
The Lumix TZ90 / ZS70’s inherits the same four continuous shooting modes as the earlier TZ80 / ZS60. Low (2fps with Live View), Medium (5fps with Live View), and High (10fps without Live View). The TZ80 / ZS60’s Super High (40fps for a burst of 60 frames and at a reduced resolution of 4.5 Megapixels using the electronic shutter) is no longer available. With Continuous autofocus, the top speed reduces slightly to 5fps regardless of whether you’re set to Medium or High, so you may as well go for the former and enjoy Live View.
Fitted with a UHS Class 3 card and set to AFS, I fired-off 35 Large Fine JPEGs in High mode in 3.46 seconds before it began to stutter – a tad faster than 10fps. Set to RAW, I captured 12 frames in 1.18 seconds – again, just a bit faster than 10fps before the camera stopped shooting. Both essentially confirm the top speed, but if you want to shoot a burst of longer than around a second you’ll need to make do with JPEGs. It’s also worth noting that with the higher resolution 20 Megapixel sensor, the TZ90 /ZS70’s JPEG burst is 10 frames shorter than the 45 frames managed by the 18 Megapixel TZ80 / ZS60.
Like other recent Lumix models with 4k video, the TZ90 / ZS70 also supports Panasonic’s 4k Photo mode – exploiting the fact 4k video captures an 8 Megapixel image up to 30 times a second. The TZ90 / ZS70 lets you easily capture bursts of video before scrolling through the footage and extracting the perfect frame as a JPEG image, all in-camera. You could of course frame grab from video externally (and here’s the clip I filmed), but Panasonic has made it easy to perform the whole process in-camera.
There’s three options: Burst (which records video while the shutter button is pressed), Burst S / S (which starts recording with one press and stops with another), and 4K Pre-burst (which keeps a one-second rolling buffer to avoid unwieldy clips to store and go through). When you press the shutter in Pre-burst mode, the camera records two seconds / 60 frames worth of action: you get the second before you pressed the button and the second after. So if you press the button as soon as the action has just happened, you should have a frame which includes some part of it from a moment earlier.

Above: Panasonic Lumix TZ90 / ZS70 4k Photo Shutter priority 1/500, f6.4, 200 ISO, 129mm (720mm equivalent)
When you play the capture back, you’re shown a still photo rather than a video clip, with the option to cycle through the frames quickly by pressing the left or right arrow keys, or even better, rotating the rear wheel. This makes it very easy to jog back and forth before selecting the perfect moment, after which a press of the Menu / Set button saves the frame as a new JPEG with 8 Megapixel resolution. You can’t save RAW files in the 4K Photo mode, but you can choose the aspect ratio prior to capture along with having full control over the focus, exposure mode, aperture, shutter and ISO.
The 4K Photo mode is great for capturing the perfect moment when faced with fast action, but it’s also surprisingly useful for portraits, especially of kids, where an expression can change between frames.
During a short video clip the Post Focus mode attempts to shift the focus between all the subjects in the frame, near and far. If successful, this short video clip essentially contains frames where any part of the composition is in focus, and it only takes a few seconds to capture. The clever bit is in playback where the camera lets you tap anywhere on the screen and automatically selects the frame from the video where it’s in focus, offering focus-peaking to further help you make the choice. Like the 4K Photo modes, it then lets you export it as an 8 Megapixel JPEG.
The third Post Focus mode – Focus Stacking – combines frames to produce a composite with greater apparent depth of field than you’d get from an individual frame. It’s particularly useful when the lighting conditions force you to shoot with a wide aperture or in macro photography where the depth of field is always very shallow.
Post focus and the other 4k modes are more than just a gimmick, it’s a great feature that takes advantage of the 8 Megapixel resolution available in 4k video frames to improve your chances of getting a great still image that truly captures the moment.
Panasonic Lumix TZ90 / ZS70 Wifi
As you’d expect, the TZ90 / ZS70 has Wifi support that allows you to wirelessly transfer images from the camera and operate it remotely using a smartphone. Like its predecessor the TZ80 / ZS70 and other recent lumix models, including the TZ100 / ZS100, the TZ90 / ZS70 doesn’t have an NFC chip, that’s not a huge drawback though, as you can quickly establish a connection manually. You can either setup a direct connection between the camera and your phone – the camera acts as a wi-fi access point – or you can connect via your home wi-fi network.
Wifi allows you to wirelessly browse the TZ90 / ZS70’s images on the larger and more detailed screen of a smartphone or tablet, copy them onto these devices, upload them to online storage or social media services (either directly or via a smartphone), or become remote-controlled using the free Lumix Image app for iOS or Android devices.
Once your phone or tablet is connected to the TZ90 / ZS70, you can remote control it, browse the images direct from the memory card, copy them onto the handset and if desired send them onto various storage or sharing services. You can also set the app to make a GPS log for subsequent syncing and tagging, create a snap movie, or photo collage.
The remote control feature shows a live image on your phone or tablet’s screen allowing you to take a photo or start or stop a video recording. If the camera’s mode dial is set to Aperture or Shutter Priority, you can remotely adjust the aperture or shutter speed respectively, and in Manual you can change both. You can drag the AF area to position it just as you would on the camera screen; at least you can if the AF mode is set to Pinpoint or 1-Area. It’s not possible to position the Custom Multi AF area group using your phone – you have to do that on the camera screen, however, this is minor omission in what is otherwise a very feature-rich app.
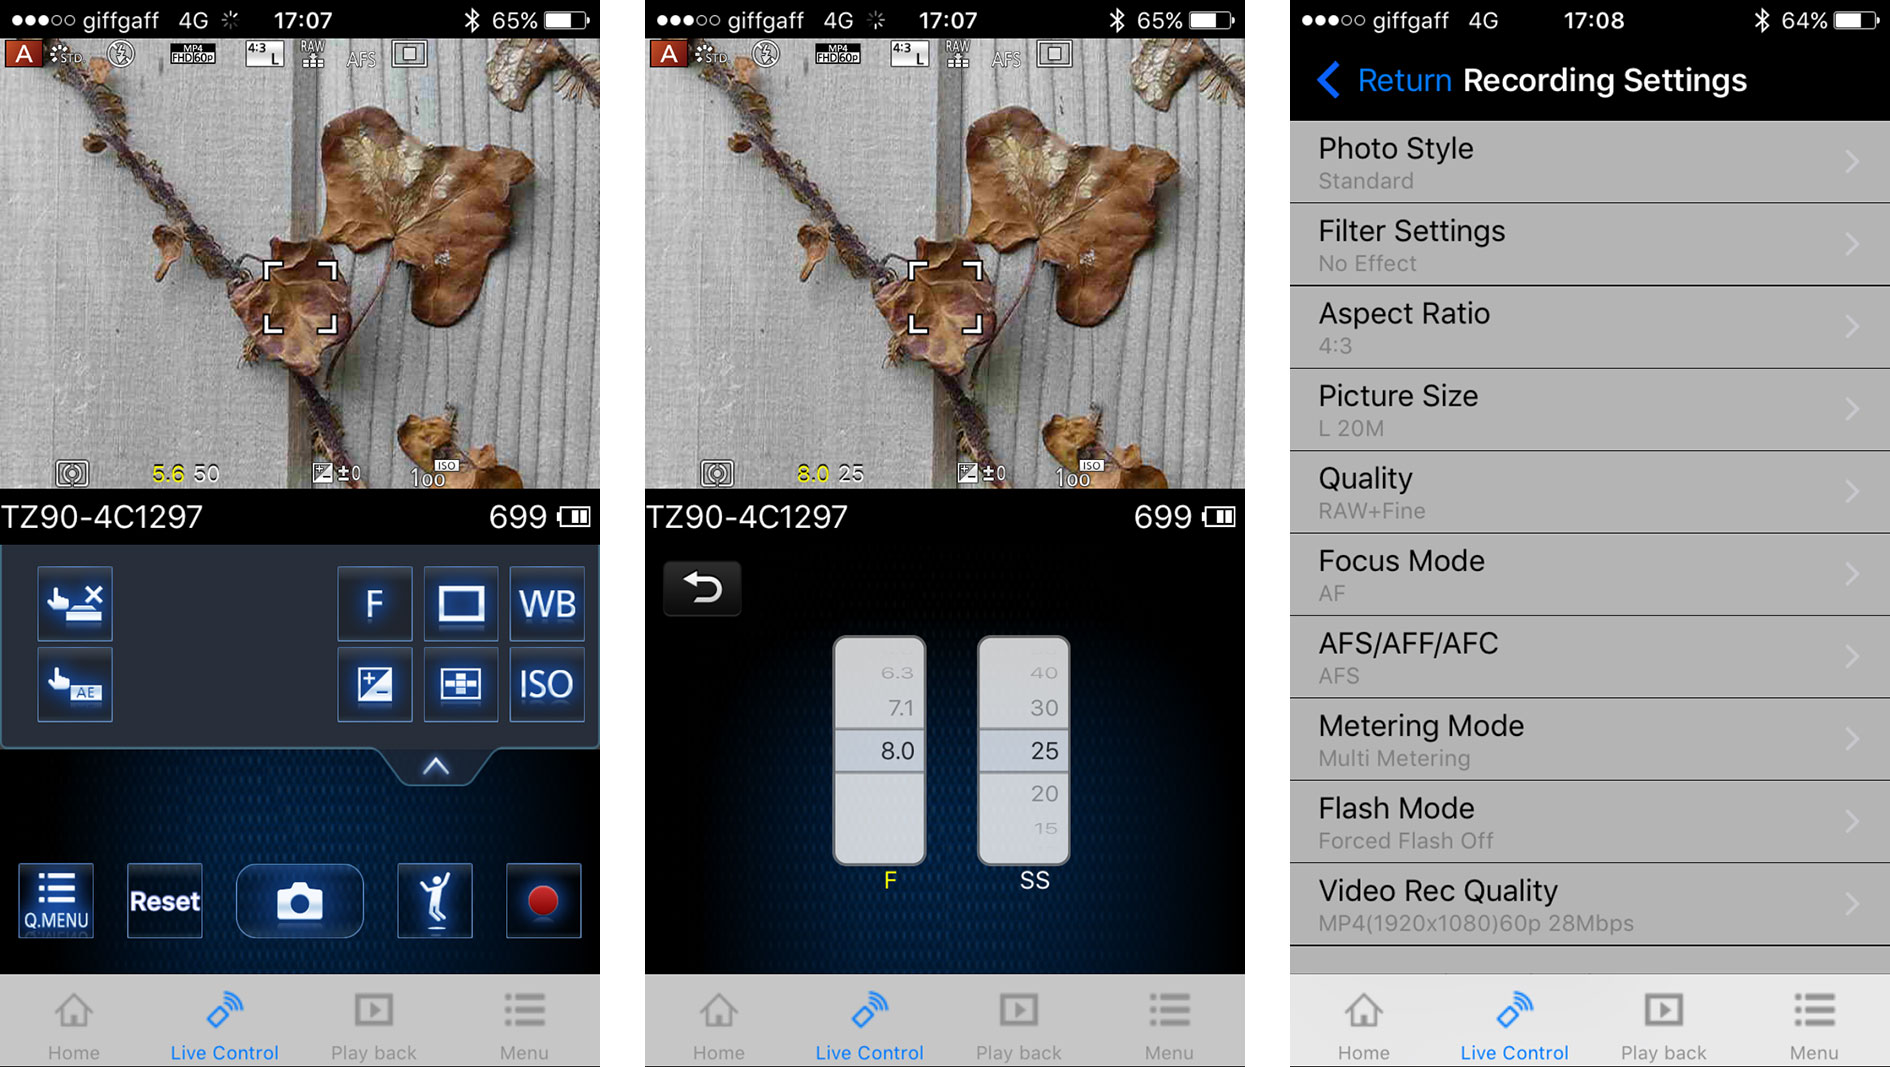
The Panasonic Image App provides access to the widest range of settings and controls of pretty much any Wi-Fi remote shooting app available. You can adjust the ISO, white balance, exposure compensation or focus area, and there’s also a Q.Menu button which presents a list of additional options you can remotely change including the focus and metering modes, aspect ratio, resolution, compression, macro mode, photo style or movie quality. You can also select burst shooting, 4K photo modes and self-timer options.
There are two options for transferring images; Batch transfer provides a menu from which you can select options to transfer the current day’s images, or you can include the last 3, 7 or 30 days, or if you’re feeling impetuous you can opt to transfer everything. Further options allow you to restrict transferred files to just photos or videos. If you want to browse the images on the card in the camera before deciding which to transfer, then Transfer selection is the option to go for.
To maintain a responsive experience, the camera sends low resolution thumbnails to your phone. Tapping one of these displays a larger view which you can pinch to zoom-in a little, but not as much as if you were viewing the original. Below the single image display are buttons to save the image to your phone, start uploading it to one of the social, sharing or storage services installed on your device, or to delete it.

You can configure the app to provide shortcuts to two or three of your most used services which could include Dropbox and Instagram in addition to the more usual suspects. Of course uploading to social media and other services is only available if you’re connected to the camera via a network as with a direct connection you won’t have internet access. Of course once the image is copied into your device, you could just exit the Panasonic app and handle it direct from whichever sharing or storage app you like via your phone’s gallery.
Finally, the Lumix Image app allows the TZ90 / ZS70 to inherit the fun Jump Snap feature introduced with the GF7. This uses the accelerometer in your phone to trigger the shutter remotely as you jump in the air. It works surprisingly well too. Using the app you can remotely view the composition and refocus the camera if necessary, before then setting the sensitivity of the jump detection. After a little fine-tuning of the sensitivity you’ll be able to capture the perfect moment when you’re at the top of your leap. It’s a really fun way to exploit the technology in your pocket.
For me, Panasonic provides one of the best wi-fi experiences of any camera manufacturer both for image transfer and remote control and shooting.
The TZ90 / ZS70 also includes Panoramic Shooting mode which takes a sequence of shots as you rotate the camera to capture a panoramic scene and then assembles them in-camera to a single image. You can hold the camera in portrait or landscape mode, you have to specify which in advance. There are two modes – Standard, which records about 180 degrees and Wide which will do a complete 360 degrees. If you’re a little uneven, or the subject makes it difficult to record overlapping images it will stop part way through and produce a panorama from what it has managed to capture – or you can press the shutter a second time to finish at a particular point. In Wide mode with the camera in landscape orientation the finished panorama measures 7952 x 960 pixels. All in all it’s very simple to use and produces very good results.
Finally, I should also mention Creative Control mode. Panasonic introduced Creative Control filter effects on the FZ47 / FZ48 back in 2011 and has been adding new ones ever since. The list has now expanded to 22 with several monochrome options, bleach bypass, Fantasy, and Sunshine in addition to old favourites including Expressive, Retro, Old Days, High Key, Low Key, Sepia, Dynamic, Rough, and Silky Monochrome, Impressive Art, High Dynamic, Cross Process, Toy Effect, Miniature Effect, Soft Focus, Star Filter, and One Point Colour.
Next check out my quality results, sample images or skip to my verdict.
Check prices at Amazon, B&H, Adorama, eBay or Wex. Alternatively get yourself a copy of my In Camera book, an official Cameralabs T-shirt or mug, or treat me to a coffee! Thanks!